Thursday 30 May 2013

Autodesk Services Implementation Tracker PLM 360 App


This week I'm covering a new app in the PLM 360 App Store, the Autodesk Services Implementation Tracker PLM 360 App. I met with Ian Hadden from Autodesk Services to discuss the app and tell us all about it.

Mike: Hi Ian, thanks for taking the time to speak to me, can you tell our readers a bit about yourself and what you do for Autodesk?

Ian: I sure can Mike, I am a Solution Architect with Autodesk PLM Services. My role is to help Autodesk’s PLM customers get the most out of their PLM deployments. That means understanding what they are looking to do with PLM, helping them find the right configuration of the system to achieve their goals and assisting in the development of that configuration. 

Mike: Sounds like you’re a busy man! Can you tell me about Autodesk Services and what are the main services you offer our customers?


Ian: Autodesk PLM Services has a menu of offerings designed for a variety of customer needs from packaged workflow solutions all the way down to essential training. For the customer, the choice really on depends on how much of the work they are willing to take on themselves. For customers that aren’t sure where to start we can also perform an RPM (Roadmap and Priority Matrix), through this process we identify the various pain points that PLM can help address and help prioritize these based on implementation ease and business impact. It’s a great way for customers to thoughtfully establish a comprehensive PLM strategy to ensure long term success.

Mike: Cool ! thanks for putting together the Autodesk Services Implementation Tracker can you explain what this is, and how our customers will use it to help manage their PLM 360 implementations? 

Ian: I started building this app to help people organize their PLM deployment. During the deployment there are key pieces of information that need to be tracked and shared with everyone involved in the project. PLM 360 is a great place to share that information. It’s made up of five major functions:

AC Implementation Management
This Workspace is for top level project management and progress tracking. Here you build out your Project Phases and Sprints. The Project management Tab in this workspace lets you link the sprints to the Phases and build dependencies between the various sprints. From here you can create the various tasks that need to be performed to complete each Phase or Sprint.


AC Implementation Tasks
This is the workspace where the Tasks that were created from the AC Implementation Management workspace are located. These tasks are assigned to individuals who are responsible for the timely completion of the task. The progress on the task is tracked through workflow and with Milestones. The Tasks can also be linked to other project elements such as requests for Scripts or Change Requests. 


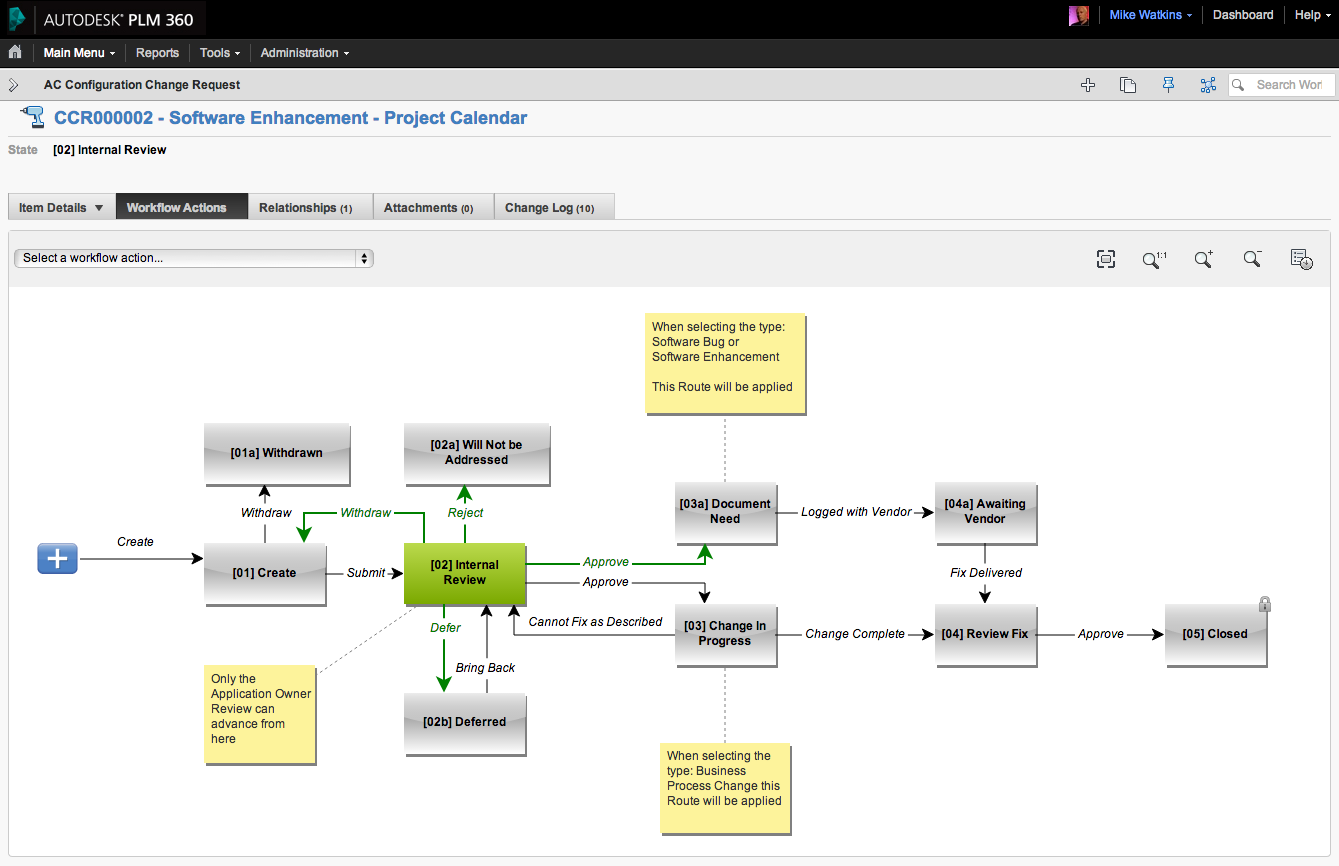
AC Configuration Change Request
As its name suggests this workspace is where requests to make changes to the current or planned configuration and be made. Once a request is submitted it is reviewed by the application Owner (see Below AC Applications) who decides if the request should progress. The Application owner also determines if this request needs to go to the Software vendor, in this case Autodesk as an enhancement or bug. For changes that can be made in house, workflow changes, adding additional fields etc. the Application owner assigns the Change request to someone to complete. The change requests can also be linked to an Implementation Task so it can be tracked in the overall project. 
AC Script Log
The AC Script Log came about as a way to keep track of all the different scripts that we needed to create or had created for a deployment. As the need for a script is identified it is captured in the AC Script log workspaces. Once the requirements for the script have been reviewed and the need confirmed the script goes forward to be developed. The Script Files tab is used to upload the different version of the script as it is developed so that they can be referred back to. It is almost like using PLM 360 to be the source control system for its own development. The Script history tab is used to capture any notes and or reasons why the script has been changed.

AC Applications

This workspace is used to allow the end users to also use the workspaces in this app to manage the deployment of other software. Just add you additional applications and their respective owner and you will be able to pick them in the applications pick list of the other workspaces. 

Mike: Excellent I think this will be a great asset to the PLM 360 App Store! Can you share some other ideas that you might have for future apps?

Ian: Certainly, in Autodesk PLM Services we are always looking for ways to make our deployments faster and less costly for customers. The app store gives us a great opportunity to build based on best practices we refine in the field. We’re currently working on some really exciting things that we hope will continue to bring valuable solutions to real world customer problems. 

Mike: Thanks Ian, I'll look forward to catching up soon and publishing your future apps to the PLM 360 App Store!

Thanks for reading.....Mike

Friday 17 May 2013

Using The New CE Marking App In PLM 360


This week I'm covering a new app in the PLM 360 App Store, the CE Marking App. The purpose of this app is to manage the approval stages needed for the affixing of the CE marking on your products. With this app you can also create the EC Declaration Of Conformity and get an automatically generated document ready to print and sign for the official bodies to approve.

Background to CE Marking..

CE marking does not indicate that a product was made in the EEA, but merely states that the product is assessed before being placed on the market and thus satisfies the legislative requirements (e.g. a harmonised level of safety) to be sold there. It means that the manufacturer has verified that the product complies with all relevant essential requirements (e.g.safety, health, environmental protection requirements) of the applicable directive(s) – or, if stipulated in the directive(s), has had it examined by a notified conformity assessment body.

Using the CE Marking App
A visual indicator will tell you if you have completed all the sections and your product is approved


Stage 1: Identify the applicable Directive(s)
Stage 1: Identify the applicable Directive(s)
The first step is to identify whether the product needs to bear CE marking or not. Not all products are required to bear CE marking, only the products that fall within the scope of at least one of the sectoral directives requiring CE marking. There are more than 20 sectoral product directives requiring CE marking covering, but not limited to, products such as electrical equipment, machines, medical devices, toys, pressure equipment, PPE, wireless devices and construction products.

Stage 2: Identify the applicable requirements of the Directive(s)


Each Directive has slightly different methods of demonstrating conformity depending on the classification of the product and its intended use. Every Directive has a number of ‘essential requirements’ that the product has to meet before being placed on the market.

Stage 3: Identify an appropriate route to conformity

Although the process is always a self-declaration process, there are various routes to conformity depending on the directive and classification of the product. Some products (such as invasive medical devices, or fire alarm and extinguisher systems) may, to some extent, have a mandatory requirement for the involvement of an authorised third party or "notified body".

Stage 4: Assessment of the product's conformity
When all of the requirements have been established, the conformity of the product to the essential requirements of the Directive(s)needs to be assessed. This usually involves assessment and/or testing, and may include an evaluation of the conformity of the product to the harmonised standard(s) identified in step 2.

Stage 5: Compile the technical documentation

Technical documentation, usually referred to as the technical file, relating to the product or range of products needs to be compiled. This information should cover every aspect relating to conformity and is likely to include details of the design, development and manufacture of the product.

Technical documentation will usually include:

  • Technical description
  • Drawings, circuit diagrams and photos
  • Bill of materials
  • Specification and, where applicable, Declarations of Conformity for the critical components and materials used
  • Details of any design calculations
  • Test reports and/or assessments
  • Instructions
  • EC Declaration of Conformity

Technical documentation can be made available in any format (i.e. paper or electronic) and must be held for a period of up to 10 years after the manufacture of the last unit, and in most cases reside in the European Economic Area (EEA). Using this App you have a permanent record to keep.

Stage 6: Make a Declaration and affix the CE marking
When the you are satisfied that your product conforms to the applicable Directives, an EC Declaration of Conformity must be completed.

Declaration of Incorporation.
The requirements for the Declaration vary slightly, but will at least include:
  • Name and address of the manufacturer
  • Details of the product (model, description and the serial number where applicable)
  • List of applicable sectoral Directives and standards that have been applied
  • A statement declaring that the product complies with all of the relevant requirements
  • Signature, name and position of the responsible person
  • The date that the Declaration was signed
  • Details of the authorised representative within the EEA (where applicable)
  • Additional Directive/standard specific requirements

Once completed you can approve the Declaration of Conformity using the workflow below:
Approval Proces for the Declaration of  Conformity

Using the Advanced Print views in PLM 360 your Declaration of Conformity will automatically be created for you
A PLM 360 Print view is automatically created 


The whole process is tracked using the CE approved 1 to 6 stage workflow process.
CE approved 1 to 6 stage workflow process.


Once a Declaration of Conformity has been completed, the final step is to affix the CE marking to the product. When this has been done, the CE marking requirements have been met.

I hope you find this CE Marking PLM 360 App useful,  I'd be interested to know what Innovative products have been managed  using this App!

Thanks for reading....Mike


Thursday 2 May 2013

Using the FMEA PLM 360 App


So as discussed in my last post, I'm gonna do a deep dive into the Apps in the PLM 360 App Store over the coming months to give you an overview of what they are all about.

First up is the FMEA App, the FMEA App or the Failure Mode Effect Analysis is used to record the results for each type for Functional, Design or Process analysis for components, assemblies, and subsystems.

The Wiki View of FMEA
Failure mode and effect analysis (FMEA) was one of the first systematic techniques for failure analysis. It was developed by reliability engineers in the 1950s to study problems that might arise from malfunctions of military systems. An FMEA is often the first step of a system reliability study. It involves reviewing as many components, assemblies, and subsystems as possible to identify failure modes, and their causes and effects. For each component, the failure modes and their resulting effects on the rest of the system are recorded in the App. An FMEA is mainly a qualitative analysis.[1] A few different types of FMEA analysis exist, like Functional, Design and Process FMEA.

Dilbert's view of FMEA!


BUT having used FMEA processes in many of my companies that I've worked for in the past, I can say that it IS effective! and with this PLM 360 App it makes the process a lot easier without you having to 'LIANCE' !

Let's cut to the chase and get on with the good stuff..

Install the App from the PLM 360 App Store, if your stuck have a look at my previous post. And don't forget to assign the right group to the Role brought over with the FMEA App.

Step 1.

Add you date, project, process type, image, customer etc to the FMEA details tab


Step 2.

Next step is to start to add the analysis for each item in your process or BOM, click in the 'FMEA Analysis Results' tab and complete a row for each process or product


Some help guides are below:

SEV - Severity
What is the Severity of the effect? 
– No harm = 1, Lethal = 10

OCC - Occurrence
What is the probability of Occurrence?
– not likely = 1, certainty = 10

DET - Detection
What is the likelihood that the failure will escape Detection before it causes effect?
– Always detected = 1, undetectable = 10


RPN  - Risk Priority Number - (Calculated Automatically)
RPN = Severity x Occurrence x Detection 
 - Ranges from 1 to 1000
 - Higher numbers have greater priority
 - Multiple failure modes exist in a system, which one is the most critical to address?
 - Risk management should consider regulatory issues

Risk Management and results
The main aim is to Reduce the RPN
- Re-design the product or Improve Processes in order to:
- Remove the failure mode, or
- Increase the detectability of the failure mode, or
- Reduce the severity by changing the effect


Step 3 

Manage the FMEA using the workflow and track using the Project Management App.


Design FMEA Benefits

 - Aids in the objective evaluation of design requirements and alternatives.

 - Increases the probability that potential failure modes and their effects on the system / product have been considered.

 - Aids in the planing of design test and development programs.

 - Aids in analyzing field concerns, design changes and in developing advanced designs.

 - Ranks potential failure modes according to their effect on the customer, thus prioritizing improvements and development testing.

 - Provides an open issue format for recommending and tracking risk reducing actions.

 - Can reduce product development timing, production startup problems, reduce costs and enhance product quality, reliability and safe

I hope you get some value from the FMEA PLM 360 App, subscribe to the blog for more in depth analysis of the Autodesk PLM 360 Apps.